Contents:- Job markers
- Job Vehicles
- Job Instructions
- Payments
- Job Progress
Job MarkersThe first location where you can get the job is from the Civilian Headquarters in San Fierro. You can mark the location by typing the command
/gps then type in the search textbox the keyword "Civilian" or the full name of the place.
Show content
Double click the name and you are done marking the location.
Show content
From there, you can start the job either in Los Santos or in the city where you currently at (San Fierro). You can teleport to Los Santos by choosing the
El Corona, Los Santos in the GUI when you enter the Bus Driver marker in Civilian Headquarters.
Click meShow content
In this tutorial, I chose the Esplande North in San Fierro.
Once you are there, click the "Have Job" button.
Click meShow content
Another place or location where you can get the job is the Los Santos Market Area (LMSA). You can mark the job in your
/gps by typing a keyword in the textbox.
Click meShow content
Show content
Job VehiclesNote: I won't be detailed about the vehicles' statistics. You can compare the job vehicles in-game if you want since the details about them are listed in the GUI.
You can find a marker where you can buy a job vehicle in either job location you choose. Enter this marker and press Z then choose the vehicle you want. There are two job vehicles for this job, the Coach and the Bus.
Coach was said to be faster than Bus since it has higher acceleration, so I guess it's recommendable for this job. Still, it's up to you.
Once you have decided which vehicle to buy, simply press the Buy button in the GUI.
Click meThe new Articulated Coach; (this is the information we should know about it); firstly, the price is $300,000 (Can be purchased at any trucks shop and/or cheap car shops), it has a max speed of 120-160 KPH (when fully-tuned + the usage of Nitrous), it can carry 130 passengers than the normal coach, it is supposed to give more payments, it's being worked on though, so stay tuned.
It gives more 25% payment and it's faster in boarding/unboarding passengers.
Job InstructionsOnce you bought the vehicle from the marker, you will spawn inside the vehicle. Or if you already have the vehicle, enter the vehicle to open the GUI to start the job.
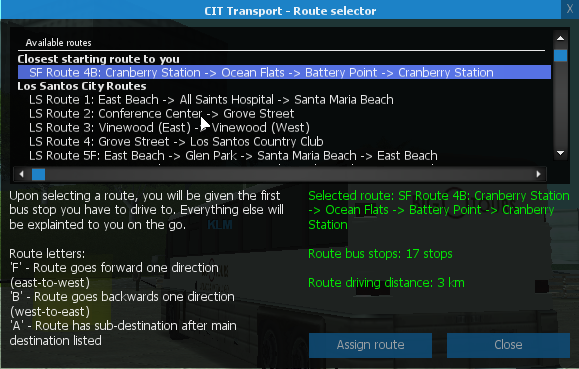
In the GUI, you are able to choose which Route to take or to start, but I recommend choosing the closest starting route or the very first line in the GUI to avoid wasting time.
If you want to start from a specific location or city, I suggest you going there manually before starting the job.
Quick explanation about the Routes.
If you notice in the GUI,
'F' - Route goes forward one direction (east-to-west)
'B' - Route goes backwards one direction (west-to-east)
'A' - Route has sub-destination after main destination listed
Example Route:
SF Route 4B:Cranberry Station > Ocean Flats > Battery Point > Cranberry Station
As mentioned in the note about rout letters of the GUI, this route is Route Letter B which is West to East.
So if we look to our map,
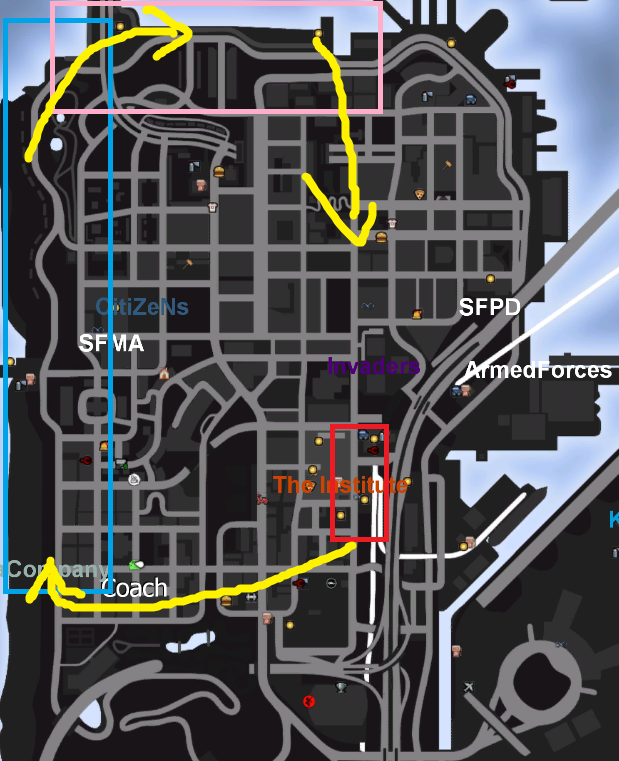
this route should start
backwards from East to South, South to West, West to North, then North to East.
So from
(EAST)Cranberry Station, going to
(WEST)Ocean Flats, then to
(NORTH)Battery Point, then finishing the route back to
(EAST)Cranberry StationIt should work the same for Route 'F' which is East to West
For Route 'A' which has sub-destination after the main destination, it isn't really a complicated one and a self-explanatory as explained in the description.
Now that we know how the Route Letter works, we also need to know a few reminders about the job.
First is the difference about the green and the red checkpoints/blips.
Green checkpoints are basically guide checkpoints as you go around the road. Pay a little attention to your radar as these green checkpoints will appear as green blips on your radar to guide you. There's an arrow inside the green checkpoints as well as additional guide.
Now
Red checkpoints are simply the bus stops. Make sure that you are not exceeding the speed limit of entering this checkpoint which is 35 KM/H (20 MPH).
Speed limit and the information listed below can be found on the bottom right corner of your screen.Once you successfully stopped at the red checkpoint,

press N to open the door to unload/load passengers.

Wait your passengers for a few seconds

Once all the passengers have boarded, press N again to close the door and proceed to the next checkpoint.
PaymentsNotes- Route that pays the most is LS Route 32.
- You will get paid every 5th bus stop.
- The payment you receive can be different from the list below sometimes but it shouldn't be too low.
List of Routes and payments you could get
if you are Level 10 + VIP hours.Show content
LS Route 32: Unity Station Terminal 3 > Angel Pine > Avispa Country Club
Route Bus Stops: 25 stops
Route Driving Distance: 13.7 km
Payment: $127,894
LS Route 33: Unity Station Terminal 3 > San Fierro Employment Office
Route Bus Stops: 26 stops
Route Driving Distance: 11.9 km
Payment: $126,853
LS Route 31: Unity Station Terminal 3 > Cranberry Station
Route Bus Stops: 24 stops
Route Driving Distance: 8.4 km
Payment: $115,426
LS Route 34: Los Santos Country Club > San Fierro Pier 69
Route Bus Stops: 22 stops
Route Driving Distance: 7.9 km
Payment: $102,732
LS Route 1: East Beach > All Saints Hospital > Santa Maria Beach
Route Bus Stops: 29 stops
Route Driving Distance: 13.8 km
Payment: $102,132
SF Route 43: Cranberry Station > Bayside Marina > El Quebrados > Las Payasadas
Route Bus Stops: 20 stops
Route Driving Distance: 14.3 km
Payment: $95,679
SF Route 42: Cranberry Station > The Big Ear > Sherman Dam
Route Bus Stops: 19 stops
Route Driving Distance: 8.7 km
Payment: $92,798
LS Route 25: Unity Station Terminal 2 > Angel Pine
Route Bus Stops: 18 stops
Route Driving Distance: 11 km
Payment: $89,630
LS Route 5B: East Beach > Santa Maria Beach > Glen Park > East Beach
Route Bus Stops: 23 stops
Route Driving Distance: 9.5 km
Payment: $84,380
LS Route 6: West Prison Release > East Prison Release
Route Bus Stops: 23 stops
Route Driving Distance: 7.5 km
Payment: $82,099
LS Route 5F: East Beach > Glen Park > Santa Maria Beach > East Beach
Route Bus Stops: 21 stops
Route Driving Distance: 8.9 km
Payment: $78,676
SF Route: 41: Cranberry Station > CITy Village > Fort Carson Hospital
Route Bus Stops: 16 stops
Route Driving Distance: 5.9 km
Payment: $77,379
SF Route 3: Missionary Hill > Cranberry Station > Pier 69
Route Bus Stops: 23 stops
Route Driving Distance: 4 km
Payment: $72,987
LS Route 7: Los Santos International Airport > Observatory > Unity Station Terminal 1
Route Bus Stops: 21 stops
Route Driving Distance: 15.5 km
Payment: $72,442
LS Route 4: Grove Street > Los Santos Country Club
Route Bus Stops: 20 stops
Route Driving Distance: 7 km
Payment: $69,615
LS Route 24: Unity Station Terminal 2 > Blueberry
Route Bus Stops: 15 stops
Route Driving Distance: 7.3 km
Payment: $69,406
LS Route 22A: Unity Station Terminal 2 > Montgomery ( Hampton Barns )
Route Bus Stops: 16 stops
Route Driving Distance: 5.1 km
Payment: $67,922
LS Route 2: Conference Center > Grove Street
Route Bus Stops: 20 stops
Route Driving Distance: 10.7 km
Payment: $66,692
LS Route 8: Ocean Docks > LSPD > All Saints Hospital
Route Bus Stops: 19 stops
Route Driving Distance: 10 km
Payment: $66,050
LS Route 23: Unity Station Terminal 2 > Palomino Creek
Route Bus Stops: 14 stops
Route Driving Distance: 6.5 km
Payment: $65,174
SF Route 2: Foster Valley > Battery Point
Route Bus Stops: 18 stops
Route Driving Distance: 4 km
Payment: $64,336
LS Route 9: Unity Station Terminal 1 > Market Station
Route Bus Stops: 19 stops
Route Driving Distance: 7.5 km
Payment: $63,614
SF Route 4B: Cranberry Station > Ocean Flats > Battery Point > Cranberry Station
Route Bus Stops: 17 stops
Route Driving Distance: 3 km
Payment: $59,274
SF Route 4F: Cranberry Station > Battery Point > Ocean Flats > Cranberry Station
Route Bus Stops: 17 stops
Route Driving Distance: 2.8 km
Payment: $58,572
SF Route 1: Avispa Country Club > Employment Office
Route Bus Stops: 16 stops
Route Driving Distance: 1.9 km
Payment: $55,168
LS Route 21: Unity Station Terminal 2 > Dillimore
Route Bus Stops: 13 stops
Route Driving Distance: 5.7 km
Payment: $52,099
LS Route 3: Vinewood ( East ) > Vinewood ( West )
Route Bus Stops: 12 stops
Route Driving Distance: 4.7 km
Payment: $43,963
State Route 44B: San Fierro to Bone County
Route Bus Stops: 35 stops
Route Driving Distance: 20km
Payment: N/A
Job ProgressList of Routes separated according to type.
Show content
City Route gives 1 bus stop to job progress
State Route gives 2 bus stops to job progress
Los Santos
City Routes
LS Route 1
LS Route 2
LS Route 3
LS Route 4
LS Route 5F
LS Route 5B
LS Route 6
LS Route 7
LS Route 8
LS Route 9 | State Routes
Route 21
Route 22A
Route 23
Route 24
Route 25
Route 31
Route 32
Route 33
Route 34 |
| . | San Fierro
City Routes
SF Route 1
SF Route 2
SF Route 3
SF Route 4F
SF Route 4B | State Routes
Route 41
Route 42
Route 43
Route 44B |
|
Green Checkpoints or Guide checkpoints - Won't be counted as Job Progress
Red checkpoints or Bus Stops - Will be counted as Job Progress (Closing the door(before leaving) is where the bus stop will be recorded as your job progress).
